Showing posts with label 18th Century. Show all posts

Nov 29, 2018

Making Eliza's Dress from Hamilton

As promised in my last post, today's post is all about the making of Eliza. For Halloween this year I decided to go as Eliza Schuyler from Hamilton. This was a really fun costume to make and wear, and it's become my favorite cosplay I've made.

During the making process I failed at taking progress pictures like I usually try to do, so this post will have a lot of written information instead of visual. However I did post a fair amount on my Instagram stories. They're featured on my profile if you want to check them out. I'll be using a few of them in today's post to help explain my process.


The Bodice
The pattern was self drafted, using a combination of draping and drafting techniques. The bodice was fairly easy to figure out since it's a pretty accurate 18th century shape, although the back has princess seams which are definitely a modern cut. But overall it stays pretty true to the 1770's.

The trick to the bodice was all in the structure. I used a medium weight canvas and muslin for the lining and structure layer. I boned the princess seams and the center back silk layer for the faux lacing (more on that soon), and the front had straight up and down boning.

It actually took a lot less boning than I was originally expecting. The only thing I would do differently here is use a heavier weight canvas and move the center front boning a little closer together and further down the point at the front. Otherwise I'm very happy with how smooth the bodice turned out.


The back of the bodice has a long row of faux lacing. If you look closely at the stage costumes, you'll notice that the back has what appears to be lacing, but underneath is actually a zipper. I contemplated just putting a zipper in the back since with my long hair no one would even see the back, but I opted for accuracy and hand sewed almost 30 eyelets.

The lining and the top fabric are stitched together everywhere except for the center back, where they're left separate. I folded the edge of the silk under to create a boning channel and put a separating zipper in the lining.


The front of the bodice has a row of buttons, again they don't function. I covered the buttons myself with a kit, which was actually really fun! I stitched button holes but didn't cut them open, and I stitched the buttons on top.

The neckline has a small lace stitched around the neckline, and there's a wider lace in the sleeves. It's all just basted in, so it's easy to remove if it ever needs to be replaced.


The Sleeves
The sleeves were another challenge. I wanted to make sure I could move and replicate the famous "work" pose. In my first mockup attempt I made a normal sleeve and could barely bring my arm up level with my chest, let alone straight up.


So after a lot of research and a couple of trials, I finally found something that worked. I found a great article, which you can read here, on how to shape a sleeve for maximum movement. It took a few attempts, but eventually I got the pattern figured out and it fit beautifully!


The Skirt
The skirt was the most difficult thing to figure out even though it's relatively simple. When I started planning I had no idea how much fabric I would need. The 18th century skirts I've made in the past only used a few yards of material, but it was clear that there was a lot more fabric in the stage skirts when they twirl.


After asking around on some Facebook groups, I realized that the minimum circumference I would need is 5 yards. And after making this, I would use 8-10 yards if I ever remake this dress.

The trick in getting the right look is all in the pleating. I'll do my best to explain, but it's one of those things that's hard to tell instead of show. The pleats have to really small but have a lot of overlap (or underlap?) You only want to see maybe 1/2 an inch, but the pleat should be 2-3 inches deep. But you want to make the first few, in the front, more shallow, to keep the front flat.

Again, this is an area I would do differently should I ever make this dress again. I didn't make my pleats small enough or overlap enough (this is where the extra fabric was needed), particularly on the back. I didn't keep the pleats small enough in the front, so there's more material and it lays differently than the original dress. It's a little detail that most people probably don't even notice, but it stands out a lot to me.

There was no real shape to the skirt, it was just one big rectangular piece. Because my fabric was 60" wide, I cut the hem down to floor length before I started pleating. Once I had the pleats pinned over my bum pad and petticoat, I used a skirt leveling technique I learned from the book Period Costume for the Stage and Screen. After that I used a 1 inch hem allowance and hand stitched it.


Basically you tie a piece of string (I used elastic. I'm still not sure if that was a good idea or not) about the waist where the waistband will be. Then you raise the skirt, in this case just the front, until the hem is even, and you cut the excess above the string/elastic and voila! You have an even, straight hem.

When working with a straight edge for a hem, you never want to trim the bottom. You want to level it from the top and cut that part instead of the hem. I speak from experience.

The Accessories
The accessories for this costume were really minimal, and I didn't even get the right colors. XD I already had a pair of black Kensington's from American Duchess, so I wore those. And because it was Halloween, I wore my favorite stockings. I wore these with the last couple of historical Halloween costumes, so it's becoming a tradition.


Nov 5, 2018

Eliza+The Halloween Party

I can't believe Halloween has already come and gone. This year my family hosted a huge party with all of our friends and we had a lot of fun dressing up, dancing, eating good food, and hanging out. 

I dressed up as Eliza from Hamilton. I didn't do a good job of documenting the making of process over the last month and a half, but I'm going to write up a blog post all about it soon.

This is probably my favorite Cosplay that I've made, and it was so comfortable to wear! I decided to make it accurate to the stage costume instead of going the historical rout. I have a crinoline petticoat and a bumpad underneath for skirt support, and the back has a zipper (though it has faux lacing to look like it's laced up).

The shoes are American Duchess Kensingon's, which I purchased last year but didn't have an opportunity to wear until this year. I also wore my favorite Halloween socks, which is becoming a tradition for me. The shoes and stockings should be cream to be accurate to the Broadway costume, but I couldn't justify buying a new pair of shoes at the time, so I went with the pair that I already had.


I tried to take photo's through the night, but I only got a few. We had so many creative and fun costumes this year!


Jun 30, 2018

The Grey Gown Photoshoot

I got together with a friend this week and had a little photoshoot. The goal was the get photo's in one of my vintage dresses but we finished quicker than we anticipated and decided to photograph a few additional dresses as well.

Luckily my friend and model, Elie, fit into everything I put her into, which gave me the idea of having her wear one of my dresses that hasn't had a proper photoshoot. It's the Grey Gown, which I made last year and only have photo's of on my dress form.

I'm in love with how these photo's came out and I'm so happy to finally have some good photo's of this ensemble! I love the soft linen and the simplicity of the outfit.


We had a visit from one of our cat's while we were shooting.


If you want to read more about the making of this dress, go here.

I'll share photo's of the other dresses we photographed in another post soon.

Jun 19, 2017

Making an 18th Century Inspired Dress Part 4 | Making the Petticoat/Skirt

Today I'm wrapping up my Making Of posts for my 18th Century Inspired Dress, talking about how I made the petticoat/skirt. In the 18th century skirts were usually separate from the bodice and were referred to as petticoats, or "outer petticoats".


The petticoat is made from 2 large rectangular pieces of fabric, approximately 50 inches wide each for a total circumference of approximately 100 inches. Once my pieces were cut I stitched the sides together with a 5/8 inch seam allowance, leaving the top 8 inches open for the side openings. 


I folded the edges of the opening over once, then again to hide the raw edges, pressed, then hand stitched to hem the opening.


After this I pleated the skirt (which unfortunately I don't have any photo's of at this stage). I originally wanted to do cartridge pleats on the skirt but when I did a quick test I found that I didn't have enough fabric and I ended up with my backup plan of knife pleats.

Next, the waistband. The waistband is created from two separate rectangular pieces. The shorter piece is for the front and the longer is for the back.


Folding the waistband in half lengthwise I pressed, then opened it up and folded the top edge under half an inch. This is for after I attached it to the skirt and to hid the raw edges of the waistband later.

I also folded and pressed the ends in by half an inch.


Opening the waistband, I placed it right sides together to the skirt and machine stitched.

I then folded the waistband over, covering the raw edges of the skirt with the folded edge of the waistband and hand stitched it closed. You'll notice that the edge of the waistband is longer on this part of the skirt. It's like this on the front waistband, but the waistband for the back sits flush with the width of the skirt. This is because I opted to go for a button closure, which isn't historically accurate from anything I've seen. I chose to do this because I liked the look and since I wasn't going for complete historical accuracy.

After attaching the back waistband the same way, I machine stitched button holes on the front waistband and stitched a couple of vintage mother of pearl buttons onto the back. And voila! The waistband was done.

Lastly I had to hem the skirt. Because of the bum pad worn under the petticoats the straight edge of the skirt was higher in the back (right). I had to cut the skirt so it was even all the way around before hemming, which I did by hand.

And that's it! I still haven't gotten any photo's of this dress worn, but hopefully I will soon.
If you haven't already, be sure to read:
Part 1 - Drafting the Bodice
Part 2 - Making the Bodice
Part 3 - Making the Stomacher

May 15, 2017

Making an 18th Century Inspired Dress Part 3 | Making the Stomacher

Today I'm continuing my Making of Post's for my 18th Century Inspired Dress with the stomacher.


Okay, so some of you may be wondering what a stomacher is. A stomacher is a V shaped bodice piece made of decorative fabric worn over the chest and stomach, most common between the 16th-18th centuries. Bodices that were open in the center front would often have a stomacher, which would be pinned into the bodice or dress. This was a style usually incorporated into more elegant dresses worn by the higher class.

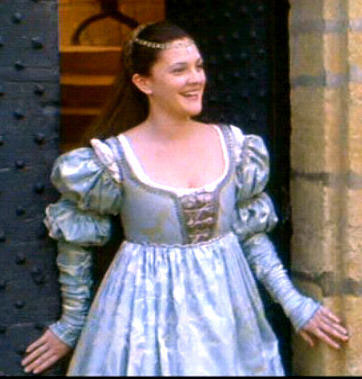
For my dress, I contemplated a couple of different options: criss-cross lacing, spiral lacing, a plain stomacher, an embroidered stomacher. I wasn't able to decided until after I re-watched one of my costume films, Ever After (if you haven't see this film yet, you should really go watch it. It's wonderful!) and was inspired by the stomacher-like piece in Danielle's blue "Monastery" dress.

I really liked the gathered fabric on it and the rounded shape, though I knew my own would be straight on the top.

Onto the actual making! I drafted the pattern using a pattern from Patterns of Fashion as a guideline, but making sure it would fit the length and width of my bodice. In the end, here's what my pattern looked like.


The next step was to cut out my fabrics. I used a duck canvas for the base layer to give it some strength, and cut two pieces of my pattern from that, which I then basted together around the bottom and side edges.

I stitched my boning channels between the two layers. For boning I just used plastic zip ties because they're cheap, easy to cut, and happened to be scraps from other projects.  You can see my boning channel pattern below. Nothing fancy, but still sturdy.


Next it was time to prepare my fashion fabric. I've had this cotton with a light print on it in my stash for forever. You can't really see the pattern in the pictures, but it's a delicate cream cotton.

I took a large rectangle piece, I didn't measure so I don't have measurements but it was about twice as long as the width of my stomacher. I stitched 3 rows of gathering stitches parallel over the entire piece.

Which I then gathered and pinned to my stomacher. I trimmed away a bit of the excess on the bottom half, because there was a bit too much fabric, before I basted it in place.


Around the bottom edge I ended up rounding it a bit when I stitched the top layer down, which I then trimmed to cut away the excess fabric.


Next I cut out a single piece from my pattern of a plain cotton, which would be for the lining. I pinned it to the other piece, right sides together, and stitched along the edges, leaving a bit open on the top edge to flip it around and put the boning in.

Before flipping it all right side out, I clipped the corners and the curved edges so it would lay flat.


All that was left after that was to insert the boning and hand stitch the top closed with an invisible slip stitch.


All done!

And that's that! The stomacher itself gets pinned into the bodice with straight pins to hold it all in place.


If you haven't already, be sure to read:
Part 1 - Drafting the Bodice
Part 2 - Making the Bodice