Dec 31, 2016

2016 Review & 2017 Plans

I feel like I have the unpopular opinion that 2016 was actually an amazing year. For me it was a year of growth, change, learning, and new adventures, which I hope will all continue in 2017. With that said, it's that time where I review my year in costumes and go over my plans for the new year.

This year I really got into the historical side of costuming, which is something I've wanted to do since I started sewing all those years ago, and it turns out I really, really love it. The reason it took me this long to get into it is because it intimidated me. But between having already started m first Victorian dress at the beginning of the year and going to Costume College I got quite a bit of historical sewing in this year.

I'm not going to go through my costumes in date order because quite frankly, I don't remember what I made when and because I've been horrible at blogging (something I want to work on next year) and I really don't know which pieces came first.

So with that said, let's get started.


2017 Review


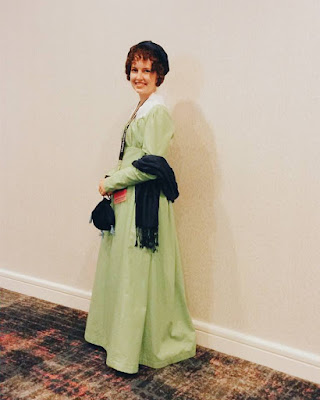
I completed my first Regency dress, and I loved it!


I (finally) finished my 1871 bustle dress and got to wear it to Costume College. I'm still adding things to this costume (it's currently hanging on my wall waiting for me to finish sewing more trim) but I'm very glad that I wore this my first time attending Costume College.


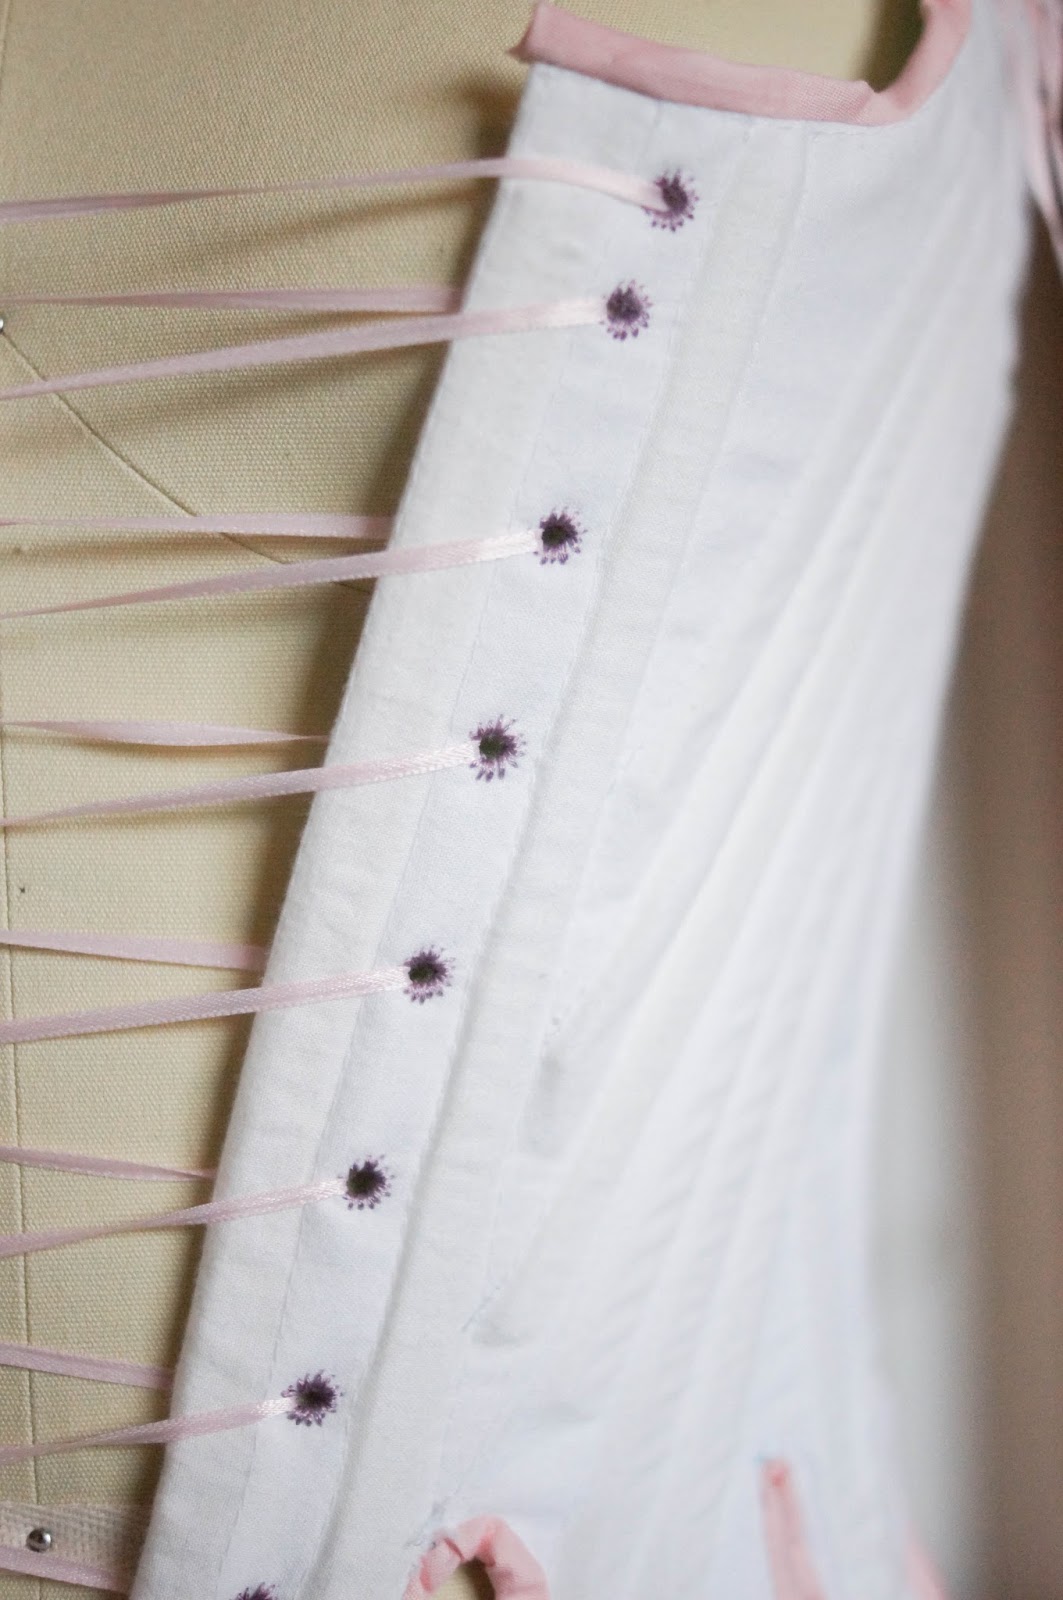
I actually ended up sewing quite a few corsets (and stays). Firstly I finished up my blue corset, which really didn't fit well but it did it's job for a while. I made a pair of Regency half stays, 18th century stays, and a new Victorian corset (which fits and is super comfy, for a corset).


This year I had the opportunity to work on several fun short films, two of which were Star Wars films. I learned a ton about working wardrobe and had so much fun on these projects. Set days are seriously the best.

This next one isn't something I made but I feel is worth mentioning because it's impacted my sewing a lot, but I got a real sewing form! I love working with it and it's a million times better than my home made form. It served it's purpose for the time, but it was time to upgrade.


This year I discovered one of my now favorite era's, the 1840's. I think it's all of the petticoats used to create such a full skirt silhouette that I love so much. But it's really a fun era and is actually pretty simple compared to a lot of other era's.


And my last one is something that I haven't blogged about yet, but if you've been following me on Instagram then you know about the 1780's Polonaise I'm currently working on. I started drafting the mock up (which is getting close to finished), have the petticoat close to done, and have already ordered my shoes from American Duchess. I'm so excited for this because it's an era I've wanted to venture into for a long time but never got around to.


Plans for 2017


This is the part of the blog post where I usually list out half a dozen or so costumes that I'd like to do in the new year but usually don't actually make. This year I'm going about my 2017 plans a bit differently. I'm not going to make a list of costumes I hope to make but instead list out some more general area's I'd like to learn and expand on.

Technical skill - I want to learn how to drape in a more professional way and eventually be able to create costumes for any size. I've already begun learning some basic draping skills and this is something that I really want to learn this year.

Victorian - I really love this era of fashion (all 60 years of it) and want to make more garments from this piece of history. I really need to make a new set of undergarments (drawers and chemise mostly), which I'll probably end up working on this year.

18th Century - I'm finally delving into this era and even though I'm only at the mock up I'm having a ton of fun with it!

Edwardian - I already have some mental plans for an Edwardian ensemble and I've just barely begun the mock up for the corset. Hopefully this ends up being an era I get to work on this year.

Regency - I may end up making another Regency dress this year as well, I really like wearing this era.

Film - I'm not sure what's in store for me in regards to working wardrobe for any films next year, but I'm hoping I'll have some opportunities again. In any case, I'm going to continue learning the skills that are required for any future costume design rolls I may get; concept sketches, drafting, construction, etc.

Cosplay - I really, really, really need to make my Rey costume (still). The fabric is literally sitting in my closet. I'd also really love to do a Jyn Erso cosplay, but that one's a little bit more complex. Those are really the only two I have in mind at the moment.


Goodbye 2016, it's been fun. Hello 2017, I'm ready for you.

Dec 27, 2016

1840's Cap and Bonnet

Today's post is about my cap and bonnet I made and wore with my 1840's dress. I pulled both of these together in a couple days before I wore the dress for Halloween. The cap is completely hand sewn and I really love how it turned out! The bonnet was something that I thought of making about a week before the party, which was too late to order a base online so I went shopping at my local thrift stores to find a plain straw hat to modify. I ended up with one for a couple of dollars from Value Village and it turned out great!


The bonnet is made from a plain cotton fabric I had in my stash, trimmed with lace (also from my stash) and ties in the back with ribbon. I drafted the pattern using this tutorial and sewed it all in a couple of hours. Overall, I really like how this turned out, however I will probably make another one in the future and make the back piece just a little bit larger (I think my measurements were off just a bit).


As I said already about the bonnet, I started off with a plain, modern sun hat. I tranformed it by cutting off the brim then pinning it to the styrofoam head in the shape I wanted and trimmed any excess away. To save time, and my sanity, I used hot glue to re-attach the brim to the base and then covered it with ribbon (also hot glued on). I pulled out my ribbon stash and played around until I found a combination that I liked.


The ribbon ties were hand sewn onto the fabric piece that sits around the crown of the hat (part of the original hat) and then I hot glued a piece of bias tape over the section where the brim and crown piece met just to make it a little more tidy.


You can see here a small portion where I didn't end up covering.

When I started the bonnet I didn't have high hopes for it, but I was pleasantly surprised by the end result.

Dec 26, 2016

Late Victorian Corset

Next up on my catch up posts is my new Victorian corset. After wearing my old Victorian corset (which I made at the beginning of this year) a few times this year I was ready to make a new one that fit better.

The pattern I used was Truly Victorian #TV110. I used duck canvas for the main layer, left over satin from my graduation dress for the outside, and the inside is lined with cotton broadcloth. I re-used the busk from my original corset I made a few years ago and the lace was some that I already had on hand, so all the materials were from my stash. #score


I really only used the pattern for the pieces; I didn't follow the instructions at all and made up the boning pattern myself. I've learned enough from my previous corsets that I didn't feel I really needed the instructions. I can't really rate the pattern because of this, but overall I feel like it's a good pattern. I ended up cutting the final fabric one size smaller than I originally had in the mock up and I get a 3" waist reduction when I lace it tight and have a perfect 2" gap!

Even though the corset is technically done I still want to floss the bones, I just haven't gotten around to it yet. It's on my list but will probably remain there for a long time.


Dec 21, 2016

My First Pair of Stays

I have wanted to make a pair of 18th century stays for a very long time. I'm not really sure what the draw to them was, because I wanted to make a pair before I was even interested in 18th century fashion. I think it had something to do with the structure and all of the boning.

So when American Duchess published Simplicity pattern 8162 for a pair of stays I made sure to buy it the next time patterns were on sale for $1, which ended up being a few weeks after I learned about the pattern.


I held onto the pattern for a while, not sure when I would actually get around to making anything from it. Then in July I was bored and decided "eh, why not start a completely new project?" So I did. I finished the mock up in a couple of days and the only major change I made was to the boning pattern to make the stays fully bonned. I also ended up cutting the pattern in the smallest size in order to be able to lace them closed properly.

Stays are very different from a Victorian corset and are a bit more comfortable because they don't reduce your waist as much. Overall, they're pretty straightforward to make, but sewing the seam binding was torture. I'm really not happy with my work on it, but it is what it is. I know better for next time.

I had the hardest time figuring out how to do the spiral lacing for some reason. I was finally able to figure it out thanks to this tutorial. My brain doesn't work well with numbers, so doing the math on this one took me a while.


All of the eyelets are hand sewn and I ended up sewing the seam binding by hand as well, to save my sanity. I opted to hand sew eyelets for two reasons. 1) They're historically accurate. 2) Metal grommets are a pain in the neck for me. I've tried them before and have yet to master them.

Because of the amount of hand sewing I ended up doing on this project I realized how much I actually love sewing by hand and want to do more on future costumes. It's very relaxing


Here's the inside of the stays. I wanted to use a fabric with some color for the outside, but I didn't have anything that would have been period accurate, so I ended up putting the color on the inside. But I ended up with pink seam binding and purple eyelets, which I really like.

Dec 16, 2016

Designing Desera

I'm attempting to catch up on all the projects I never posted about, or even photographed, from this year so I can do my end of year review post. Today's post is about a costume I made for a film I worked on with Rogue Zohu this summer.

The film was a Star Wars fan film for the Lightsaber Choreography Competition, which is something my sister and I have wanted to do for a couple of years now. Our film ended up with an honorable mention, or the equivalent of 4th place.

Working on this film was so much fun but during production we had all sorts of problems, the biggest being that my sister (who plays one of the leads, Desera) ended up breaking her clavicle on the 2nd day of filming. We were never able to finish filming and due to the 3 minute time limit they had to cut the beginning dialog out. Nonetheless, it still turned out to be an awesome short and I can't wait for the "full" version to be released.

For this project I co-wrote the script as well as was one of the two Costume Designers. I ended up working mostly on Desera's costume but helped contribute idea's for the other's as well.


I drafted the pattern/made the tunic, obi, and cuffs myself. The fabric I used was a cheap synthetic fiber that dirt did not like to stick to. To get the costume as dirty as we wanted we ended up using a combination of real dirt/mud, spray paint, and wood stain. The wood stain was what really made it.


One set, day 1. Pic via @anniefilmmaker
Designing this costume was an interesting challenge. The setting for the short is a dystopian Star Wars world torn by war. Desera's a senator trying to end the conflict but one of her opponents/enemy's hired an assassin who abducted her from one of her rallies in order to assassinate her.

I had so much fun researching for this because I got to bring out all of my Star Wars books to look for inspiration and design elements to incorporate in the costumes. The main inspiration for Desera was the handmaiden battle outfits from The Phantom Menace. I wanted something that looked elegant but functional. I ended up with a color scheme of red and blue because of the symbolism; blue fors peace and red for spirit and passion, which embodies Desera's character and what she's trying to accomplish.

The mostly completed costume. A few design elements were added after.

As I already said, I drafted the patterns myself. The tunic was pretty simple and is shaped in the front with two darts and the back is made of 3 pieces with princess seams. The shoulders are padded and the skirt is a three piece pattern pleated onto the bodice. The obi is bonned to hold it's shape and the cuffs are a simple design that close with snaps.

Before distressing...
And after distressing. Believe it or not, we ended up adding more dirt after this picture was taken.
This was also the first time I distressed a costume. I was a bit worried since I'd never done this before. My biggest fear was that I'd end up distressing it too much. But as it turns out, you simply cannot distress a costume too much. You just can't. We had a rather difficult time getting it dirty and beat up enough. The costumes don't look nearly as rough on screen as they did in person.

There were a ton of tiny details about this costume that I wish I could have done a better job on (mostly construction wise), but because of my limited amount of time to make it I didn't have time to fix a lot of things. Though, I'm pretty sure I'm the only one who notices these things. Every time I'd point something out that I wish I could have fixed my sister would tell me that she had no idea what I was talking about because it looked great to her. The curse of being a perfectionist.

Dec 13, 2016

The Green Regency Dress

This year I completed my first Regency dress, hooray! I say completed because one of the first dresses I ever tried to sew was a Regency dress made from a nasty pink floral cotton and a Simplicity pattern. It didn't end well. In fact, it never actually ended because I never quite finished it. But that was a long time ago.

Near the beginning of this year I finally watched the 2005 Pride and Prejudice, and because of that movie I actually fell in love with the Regency era (fashion wise) as well as the story. I know, I know, it's practically illegal to like the 2005 film, but I do and it's the only film adaptation of any Jane Austen novel that I actually liked.


Well, after watching it I decided to make make a Regency dress. After doing some research I decided on making an apron front (or drop front) dress, because I liked the simplicity of it and it's easy to get into without any help. The pattern I ended up with is Laughing Moon #126, which I'm actually working on writing a review for.

The mock up went beautifully and the pattern didn't need any alterations. None. It was awesome.

Starting off, here's what I wore underneath (minus the chemise, because I need to re-make it). I wore my half stays (made with a modified version of the Regency stay pattern from Jean Hunnisett's book, Period Costume for the Stage and Screen) and a petticoat. I used the same skirt pattern as for the actual dress and pleated it in the same way, attaching it to a waistband with criss-cross straps. It closes with a hook and eye on the side where I left one of the seams open about 8 inches.


Petticoats during this era wore worn more for modesty than for adding fullness to the skirt. Because the skirts were so slim compared to the styles beforehand, when a lady was walking or if there was a breeze the skirts would hug to the legs which wasn't modest for the time.

On to the actual dress. Here's the dress before the apron front is pulled up. As you can see it ties in the front underneath to hold it in place. The apron piece that comes over top is gathered with ribbons along the top and is pinned at the corners onto the dress to hold it up.


I ended up with a green stretch cotton sateen for this dress, which was a little bit heavy but because of the weight it drapes rather nicely. It's just too heavy to hang when I'm storing it which means I have to store it folded. The only problem I have with that is when I do want to bring it out I have to iron the entire thing.


You can kind of see the pin holding the apron up here


Regency is such an easy era to sew and wear; I love it! Everything is so loose, you don't have any hoops or bustles, and with a pair of half stays it's basically like the historical equivalent of yoga pants. I really want to make more dresses from this era and I really need to make a Spencer jacket to go with it.