Dec 30, 2017

2017 in Review and 2018 Plans

With only a day and half left in 2017 I figured it was about time I sat down and wrote my annual year in review post.

This year was a good year for me costume wise. I branched out into a some new era's of historical dress as well as had my first internship. I feel like I've gained a lot of technical skills such as draping and have a lot more confidence in my abilities than I did at the beginning of the year.

In Review

I started the year off by working on a couple of late 18th century ensembles. The Polonaise, and then the Gray Gown.

In February I started working on Padme's Picnic Dress (AKA Project P19), which is still a work in progress.

For Aviation Day I made a 1930's Aviatrix outfit, which I wore later in a 1940's style for Vintage Aircraft Weekend.

During the summer I interned in the wardrobe department of Beauty and the Beast, and during production helped maintain the costumes and worked as a dresser. I have so many good memories from that experience.

Then for Vintage Aircraft Weekend I made a 1940's swing dress.

For Halloween I updated my 1871 dress by making a new shirtwaist and sash for my "portrait" costume.

Next was the 1841 Marie Louise Gown, which is also still in progress. It's close to done, but I got sidetracked and it got pushed to the back burner.

Lastly, my final project for the year is a WWI era corset and chemise, which will have a proper blog post soon.

1770's Polonaise

The Gray Gown

Padme's Picnic Dress/Project P19

1930's Aviatrix from Aviation Day

Beauty and the Beast
1940's Swing Dress worn at the dinner dance at VAW

1940's Aviatrix worn at Vintage Aircraft Weekend

1870's Portrait Costume for Halloween

The 1841 Marie Louise Gown in progress
WWI era corset and chemise


Plans for 2018


Every year I make a post full of idea's of things I want to accomplish the following year, and I usually don't follow through with much if any of the things I hoped to. So this year, I'm taking a slightly different approach.

Instead of having a list of specific costumes, I have slightly more vague goals for myself.

Goals:

-Develop my artistic voice and style. I really want to start finding and developing my style for both costuming and my blogging.

-Focus more on 20th century fashion. I specifically want to build a 1940's wardrobe, as I have several events each year I attend where WWII era fashion is appropriate.

-I also want to explore the fashions from 1916-18. I have some plans already, as well as fabric on the way.

-Finish P19 before Comic Con

Those are the only specific goals I have for this year, but I expect I'll experiment with a couple of other era's and likely continue a bit of 1840's through the year.

And with that, goodbye 2017. Hello 2018!
Dec 27, 2017

Misconceptions of Women and Pants in the 20th Century

Last month I attended a camera convention with a friend where we attended a class about cinemagraph's and how to make them. The instructor had a live model and backdrop so he could demonstrate the process from beginning to end, and it was really fun to see the process of making these moving photographs.

His set up was an Amelia Earhart theme with a vintage plane backdrop and the model wearing a leather jacket, helmet and a pair of tan slacks. It wasn't at all historically accurate, but it got the idea across

She was adjusting her clothes as she got in position for the photo and she made a remark about women's pants as she pulled them up higher to try and get her (low cut) pants to her waist. The remark she made was something about how pants were worn higher, and then she followed that with something along the lines of "pants were worn higher up because they didn't make them for women, so they didn't fit well." and "Women didn't wear pants back then."

Being a historical costumer and having recently researched women in aviation specifically, I wanted to scream.

"No! None of what you just said is true!"

But I sat still, cringing inside instead.

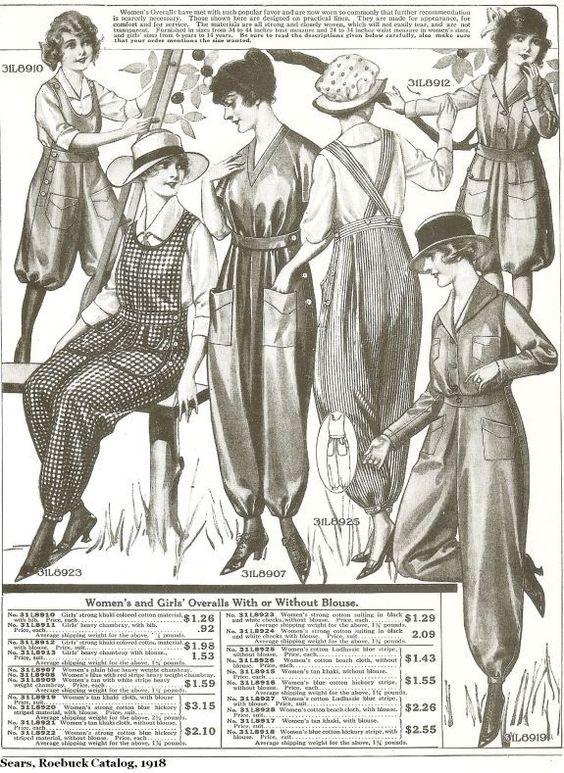
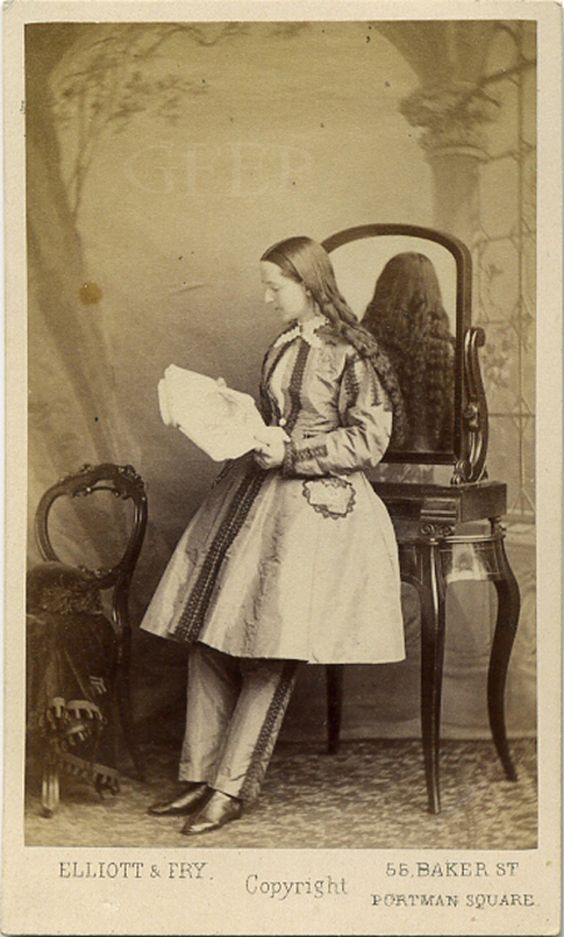
It got me thinking about women and pants and just how long we've been wearing them. I've assembled a collection of women in pants dating as far back as the Civil War in the 1860's, proving that average women did in fact wear pants.
Sears Catalog c. 1918 displaying an array of pants options for women.

Women in pants c. late 1920's 

Woman in trousers c. 1930's

Catalog displaying women's trousers from the 1940's

Ginger Rogers wearing a pair of trousers in the 1940's 

Dr. Mary Walker wearing pants in during the Civil War.

As you can see, women most certainly *did* wear pants in the first half of the 20th century, and no, they weren't men's pants.

I want to address a couple of misconceptions that were expressed by the model that day, and that I'm sure other's have thought too.

1. "Pants were worn higher because they didn't make pants for women."
Not true. They were worn higher because that's what the fashion was at the time, for both men and women. And just like men's pants, you could find women's pants in clothing stores and catalogs. Or, you could always make a pair yourself.

2. "They didn't make pants for women."
Also not true.  To continue off my first point, they most certainly did make pants for women, as is proved by the numerous catalogs for women's trousers throughout the 20th century (not to mention the endless photographs showing women wearing pants).

In Conclusion:
It was common for women to wear pants for sports and physical activities such as horseback riding, hiking, and flying. In the 30's, another style of pants called beach pajama's were common, and were a very wide leg trouser made from comfortable fabrics.

During WWII women began wearing denim trousers more as they entered the work field, as comfort and mobility were needed, though it wasn't until the 50's and 60's that it became common to wear pants on a daily basis.

This is only a brief explanation of women and when they started wearing pants, there's a lot more to it, but that's all I'm going to cover for now. Hopefully this clears up some misconceptions that some people may have.

Dec 25, 2017

Merry Christmas

Just a quick post to say Merry Christmas! Wishing you and your family a wonderful holiday filled with lots of joy and plenty of fabric. ;)


Dec 19, 2017

1914 Corset Beginnings+Inspiration

My sister and I recently started watching Downton Abbey together (this is my second time going through the series and her first time), and I've completely fallen in love with the clothing from the later war years. It's both elegant and practical at the same time, which really appeals to me.

I've been slowly coming around to the idea of working in this era, and watching Downton Abbey was the the final straw to break me. This weekend I started working on a new corset for the era.


The pattern I'm using is from Bridges of the Body, and it's been a great pattern. I had some difficulty with getting it to the right scale (as I do every time I try to scale up a pattern), but I was able to get it close enough and made a few adjustments once I had it printed out.

The mock-up came together quickly and surprisingly easily. My first attempt I was completely over thinking it and tried changing some of the dimensions because the original on the pattern were just slightly smaller than my usual corseted measurements, but that only ruined the lines and ended up being too big anyways. I ended up adding seam allowance to the original pattern and it fit perfectly, despite being printed slightly smaller than it was supposed to be. Go figure.


Corsets from this era are, to me at least, a little weird. The silhouette of the period was so long and slender, with far less emphasis on the bust and bum than was popular in the early 1900's. The corsets from this era usually sit with a low bust and extend past the hips and are *so* long. But it's slowly growing on me.

In case you're unfamiliar with the era, I thought I'd leave you off with some pretty 1910's inspiration. You can check out my Pinterest board for more WWI era goodies too.

Corset C. 1914 Via Bridges of the Body

Corset C. 1912-14 from the Kent State University Museum
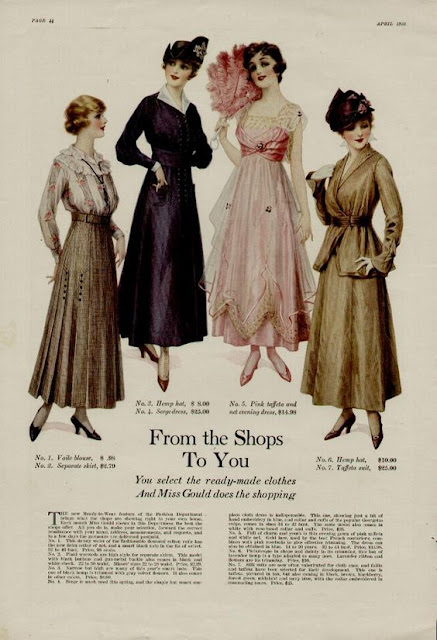
Catalog C. 1916. I'm in love with each of these outfits


Dec 14, 2017

Project P-19 Update

In honor of The Last Jedi premier tonight, I thought I should post something Star Wars related. It's been a while (10 months, actually) since I've posted about Project P19/Padme's Picnic Dress, and I thought it was time for an update.


I'm still working on the bodice embroidery, and it's getting closer to being completed which means soon I'll be starting the next phase of embroidery: the skirt and blouse (which will be far less complex, but a larger scale).

Considering I don't actually know anything about embroidery and I'm just making it up as I go, I'm pretty happy with the result.

Since this costume has spent a bit of time in the UFO pile these past few months, I decided to give myself a deadline to finish it before Comic-Con in March. Wish me luck!

Dec 11, 2017

Lace Tuckers, or What Exactly is That Thing?

When I started analyzing the portrait of Marie-Louise for my reproduction, I spotted something that I was unsure of. Around the neckline of the dress I noticed what I could only assume was a fancy chemise, so I started researching to fine out exactly what it was.

Details of the portrait of Queen Marie-Louise of Belgium. C. 1841

I wasn't able to find anything on fancy chemise's and eventually I posted my question on a sewing group on Facebook. Turns out, it's not a chemise, but an accessory called a tucker, which would be stitched straight into the dress, or in some cases be pinned into the dress instead.

A tucker would sometimes be unseen by being attached below the neckline, but in many cases they were shown. They had a drawstring around the neckline which would be tied to keep the neckline from gaping, and were often made of fine lace.

Below are some inspiration and examples of tuckers.

Portrait of Queen Victoria c. 1861. Via the Royal Collection Trust

Silk Gown C. 1865. Via

Portrait c. 1863. Via

Tucker's were most common during the mid 19th century, the 1850's and 60's particularly, due to the fashions of that time. However, tuckers can be seen throughout the 19th century and even into the early 20th century.

Dec 6, 2017

Making an 1841 Evening Gown | Bodice and Sleeves

Today I'm sharing the process of making the bodice of my 1841 Marie-Louise gown. I'm still in the process of making it, but I wanted to share what I have done thus far, mainly the bodice.

The pattern is self drafted, based off of a pattern from Patterns for Stage and Screen by Jean Hunnisett. To draft the pattern, I draped it on my dress form, patterned that, made a few adjustments and then went on to make one final mock-up before cutting into the actual fabric.

Speaking of fabric, the fabric I'm using is a faux silk taffeta from Bangkok Thai Silk. It looks more purple in the pictures, but it's a black-shot-red color.

I cut my pattern pieces out of both my fashion fabric and muslin and flat lined them by surging them together. Once that was done I stitched all the pieces together with a 1/2 inch seam allowance, leaving the back open.


On the dress form, before any boning was added.
The next step was to add boning. I used single fold bias tape for my boning channels, stitched directly into the seam allowance.


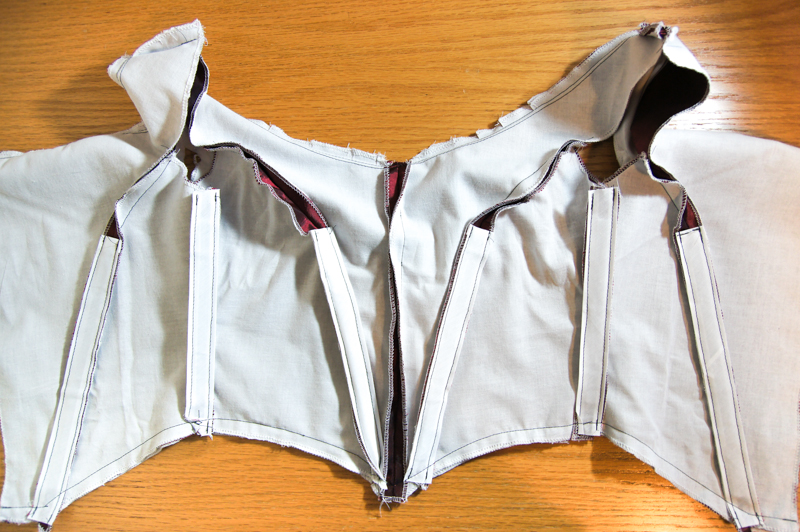
After I added boning to the seams, I decided that it needed more structure, so I decided to add boning into the lining pieces of the front side pieces of the bodice. I cut my bodice pattern out of another layer of muslin to create the lining.

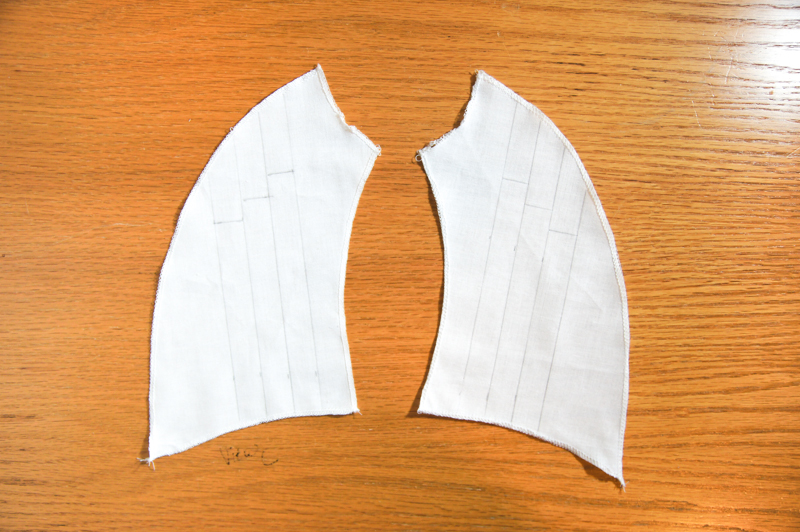
To add the boning to the lining, I cut out 2 more pieces of the front side pieces, surged the edges, and drew my boning channels. I originally thought that I would place the pieces against the inside of the bodice, matching the seams, but I quickly realized that if I did that then the boning would be at the wrong angle.

Instead, I still used the same pieces, but I ended up stitching them at a different (crooked) angle to my lining. Since it would not be visible once the lining was finished, I decided not to bother redrawing/positioning them.


My lining, with the additional boning channels stitched.
Next I stitched the lining to the bodice with right sides together, and stitching across the top with a 1/2 inch seam allowance. I under stitched the lining before clipping the curved edges and turning it all outward.


Here's what it looked like at this point.

The next thing to do was the sleeves. These were also self drafted and based from the same book as the bodice. They were relatively simple to both draft and assemble. They consist of two pieces, the lining and the fashion fabric, which as you can see are quite different in shape and size.

Once the pieces were cut I surged them and ran a gathering stitch across the top and bottom of the fashion fabric pieces.


After that I gathered the top piece down to the measurements of the lining pieces. If I were to do this again and I would make the top piece a bit longer to give a little more volume, and I would center the gathers more towards the center instead of spreading it out mostly evenly.

Once I had the gathers pinned to the lining piece, I basted along both sides to hold the gathers to the lining. Then with right sides together, I folded it in half lengthwise and stitched with a 1/2 inch seam allowance, creating the sleeve.

After this, I attached the sleeves to the bodice by hand.


What the dress currently looks like (and also a more accurate color)

That's all for today's post. I'll have more posts soon about the bertha and eventually the skirt.