Showing posts with label Tutorials. Show all posts

May 8, 2018

The Making of Padme's Picnic Dress - Part 2 Hair Buns Tutorial+Crochet Pattern

Today's post is going to be all about how I made the head piece for Padme's Picnic Gown. If you missed part 1, you can find it here.

When I was making this part of the costume I made sure to keep notes on how I made it so I could make a tutorial out of it, because I wasn't able to find one already. So I hope this is helpful to anyone else making this costume.


I would like to note that the crochet pattern I used was written as I went and I have not tested. Hopefully it will make sense.

To get things started, let's go over the needed supplies

Materials:

-Yarn. I was able to find the perfect color with a strand of gold tinsel spun into the yarn. You can find it at Joann's by clinking here.
-Crochet hook, 1.5mm
-Wig hair (I used some extra wefts from an old wig I re-tracked)
-2 hair nets. You can find these in the hair section at stores like Target. I found mine at Fred Meyers.
-Green ribbon
-Green embroidery thread
-Elastic

The first step is to make the buns using the pattern below.

Crochet Pattern:

Ch 8 and join with sl st
Ch 6 and sc in center of loop x6
Ch 6, sc in loop, repeat until reaching next round and increase to 8ch, then 10
On the 5th row ch 6 and sc into loop then ch 6 and sc into same loop. Repeat for entire round
Ch 8 and sc into each loop
After 2 rows, decrease to 6 ch for 1 round
On next round, decrease to 5 ch for 3 rows
Ch 4 and sc into loop for one round
Finish off and weave in ends

Cut two pieces of yarn approximately 12" long and weave into outer edge. This will be used to pull it closed later.


Assembling the Buns:

Take the hair wefts and play with them until you get a good amount/shape.


Place them inside of the hair nets and pull the excess net towards the back. If you leave the hair attached to the weft's, try to arrange the hair so that that won't be seen.


Place the hair in the bun and make any adjustments necessary to make it look nice on the outside.

Once you're satisfied, pull the yarn closed and tie it off.


Making the headband:

I made the headband from ribbon and elastic. Measure around the widest part of your head and cut the ribbon to that size. I decided the easiest way to get it on and off would be to use elastic at the back.

It took a little bit of playing with it to get the sizing right, but after playing around for a while I cut an approximate 2" piece of elastic and sewed it to the center back, cutting off a bit of the ribbon.

After it was stitched I added three rows of embroidery along the edges and the center of the band. I used a twist embroidery stitch.


When that was finished I used the same process for the flowers as I did on the bodice, cutting them out of the curtain panel I used and stitching them on the band.

To keep everything secure, I stitched the buns to the headband and while I wore them I pinned them to my hair with bobby pins to keep everything in place.

And that's it!


Dec 6, 2017

Making an 1841 Evening Gown | Bodice and Sleeves

Today I'm sharing the process of making the bodice of my 1841 Marie-Louise gown. I'm still in the process of making it, but I wanted to share what I have done thus far, mainly the bodice.

The pattern is self drafted, based off of a pattern from Patterns for Stage and Screen by Jean Hunnisett. To draft the pattern, I draped it on my dress form, patterned that, made a few adjustments and then went on to make one final mock-up before cutting into the actual fabric.

Speaking of fabric, the fabric I'm using is a faux silk taffeta from Bangkok Thai Silk. It looks more purple in the pictures, but it's a black-shot-red color.

I cut my pattern pieces out of both my fashion fabric and muslin and flat lined them by surging them together. Once that was done I stitched all the pieces together with a 1/2 inch seam allowance, leaving the back open.


On the dress form, before any boning was added.
The next step was to add boning. I used single fold bias tape for my boning channels, stitched directly into the seam allowance.


After I added boning to the seams, I decided that it needed more structure, so I decided to add boning into the lining pieces of the front side pieces of the bodice. I cut my bodice pattern out of another layer of muslin to create the lining.

To add the boning to the lining, I cut out 2 more pieces of the front side pieces, surged the edges, and drew my boning channels. I originally thought that I would place the pieces against the inside of the bodice, matching the seams, but I quickly realized that if I did that then the boning would be at the wrong angle.

Instead, I still used the same pieces, but I ended up stitching them at a different (crooked) angle to my lining. Since it would not be visible once the lining was finished, I decided not to bother redrawing/positioning them.


My lining, with the additional boning channels stitched.
Next I stitched the lining to the bodice with right sides together, and stitching across the top with a 1/2 inch seam allowance. I under stitched the lining before clipping the curved edges and turning it all outward.


Here's what it looked like at this point.

The next thing to do was the sleeves. These were also self drafted and based from the same book as the bodice. They were relatively simple to both draft and assemble. They consist of two pieces, the lining and the fashion fabric, which as you can see are quite different in shape and size.

Once the pieces were cut I surged them and ran a gathering stitch across the top and bottom of the fashion fabric pieces.


After that I gathered the top piece down to the measurements of the lining pieces. If I were to do this again and I would make the top piece a bit longer to give a little more volume, and I would center the gathers more towards the center instead of spreading it out mostly evenly.

Once I had the gathers pinned to the lining piece, I basted along both sides to hold the gathers to the lining. Then with right sides together, I folded it in half lengthwise and stitched with a 1/2 inch seam allowance, creating the sleeve.

After this, I attached the sleeves to the bodice by hand.


What the dress currently looks like (and also a more accurate color)

That's all for today's post. I'll have more posts soon about the bertha and eventually the skirt.

Jun 19, 2017

Making an 18th Century Inspired Dress Part 4 | Making the Petticoat/Skirt

Today I'm wrapping up my Making Of posts for my 18th Century Inspired Dress, talking about how I made the petticoat/skirt. In the 18th century skirts were usually separate from the bodice and were referred to as petticoats, or "outer petticoats".


The petticoat is made from 2 large rectangular pieces of fabric, approximately 50 inches wide each for a total circumference of approximately 100 inches. Once my pieces were cut I stitched the sides together with a 5/8 inch seam allowance, leaving the top 8 inches open for the side openings. 


I folded the edges of the opening over once, then again to hide the raw edges, pressed, then hand stitched to hem the opening.


After this I pleated the skirt (which unfortunately I don't have any photo's of at this stage). I originally wanted to do cartridge pleats on the skirt but when I did a quick test I found that I didn't have enough fabric and I ended up with my backup plan of knife pleats.

Next, the waistband. The waistband is created from two separate rectangular pieces. The shorter piece is for the front and the longer is for the back.


Folding the waistband in half lengthwise I pressed, then opened it up and folded the top edge under half an inch. This is for after I attached it to the skirt and to hid the raw edges of the waistband later.

I also folded and pressed the ends in by half an inch.


Opening the waistband, I placed it right sides together to the skirt and machine stitched.

I then folded the waistband over, covering the raw edges of the skirt with the folded edge of the waistband and hand stitched it closed. You'll notice that the edge of the waistband is longer on this part of the skirt. It's like this on the front waistband, but the waistband for the back sits flush with the width of the skirt. This is because I opted to go for a button closure, which isn't historically accurate from anything I've seen. I chose to do this because I liked the look and since I wasn't going for complete historical accuracy.

After attaching the back waistband the same way, I machine stitched button holes on the front waistband and stitched a couple of vintage mother of pearl buttons onto the back. And voila! The waistband was done.

Lastly I had to hem the skirt. Because of the bum pad worn under the petticoats the straight edge of the skirt was higher in the back (right). I had to cut the skirt so it was even all the way around before hemming, which I did by hand.

And that's it! I still haven't gotten any photo's of this dress worn, but hopefully I will soon.
If you haven't already, be sure to read:
Part 1 - Drafting the Bodice
Part 2 - Making the Bodice
Part 3 - Making the Stomacher

May 15, 2017

Making an 18th Century Inspired Dress Part 3 | Making the Stomacher

Today I'm continuing my Making of Post's for my 18th Century Inspired Dress with the stomacher.


Okay, so some of you may be wondering what a stomacher is. A stomacher is a V shaped bodice piece made of decorative fabric worn over the chest and stomach, most common between the 16th-18th centuries. Bodices that were open in the center front would often have a stomacher, which would be pinned into the bodice or dress. This was a style usually incorporated into more elegant dresses worn by the higher class.

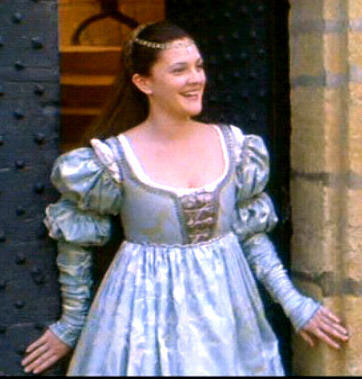
For my dress, I contemplated a couple of different options: criss-cross lacing, spiral lacing, a plain stomacher, an embroidered stomacher. I wasn't able to decided until after I re-watched one of my costume films, Ever After (if you haven't see this film yet, you should really go watch it. It's wonderful!) and was inspired by the stomacher-like piece in Danielle's blue "Monastery" dress.

I really liked the gathered fabric on it and the rounded shape, though I knew my own would be straight on the top.

Onto the actual making! I drafted the pattern using a pattern from Patterns of Fashion as a guideline, but making sure it would fit the length and width of my bodice. In the end, here's what my pattern looked like.


The next step was to cut out my fabrics. I used a duck canvas for the base layer to give it some strength, and cut two pieces of my pattern from that, which I then basted together around the bottom and side edges.

I stitched my boning channels between the two layers. For boning I just used plastic zip ties because they're cheap, easy to cut, and happened to be scraps from other projects.  You can see my boning channel pattern below. Nothing fancy, but still sturdy.


Next it was time to prepare my fashion fabric. I've had this cotton with a light print on it in my stash for forever. You can't really see the pattern in the pictures, but it's a delicate cream cotton.

I took a large rectangle piece, I didn't measure so I don't have measurements but it was about twice as long as the width of my stomacher. I stitched 3 rows of gathering stitches parallel over the entire piece.

Which I then gathered and pinned to my stomacher. I trimmed away a bit of the excess on the bottom half, because there was a bit too much fabric, before I basted it in place.


Around the bottom edge I ended up rounding it a bit when I stitched the top layer down, which I then trimmed to cut away the excess fabric.


Next I cut out a single piece from my pattern of a plain cotton, which would be for the lining. I pinned it to the other piece, right sides together, and stitched along the edges, leaving a bit open on the top edge to flip it around and put the boning in.

Before flipping it all right side out, I clipped the corners and the curved edges so it would lay flat.


All that was left after that was to insert the boning and hand stitch the top closed with an invisible slip stitch.


All done!

And that's that! The stomacher itself gets pinned into the bodice with straight pins to hold it all in place.


If you haven't already, be sure to read:
Part 1 - Drafting the Bodice
Part 2 - Making the Bodice